The Meeting Recording Page
Understand everything you can do on a meeting recording page, from video playback and transcript editing to OptiAgent and speaker analytics.
After the assistant finishes recording a meeting, Optiverse processes it and creates a dedicated recording page. This is where all the intelligence from your meeting lives: the video or audio, the full transcript, speaker statistics, AI-generated summaries, action items, and your personal OptiAgent assistant.
Video and Audio Playback
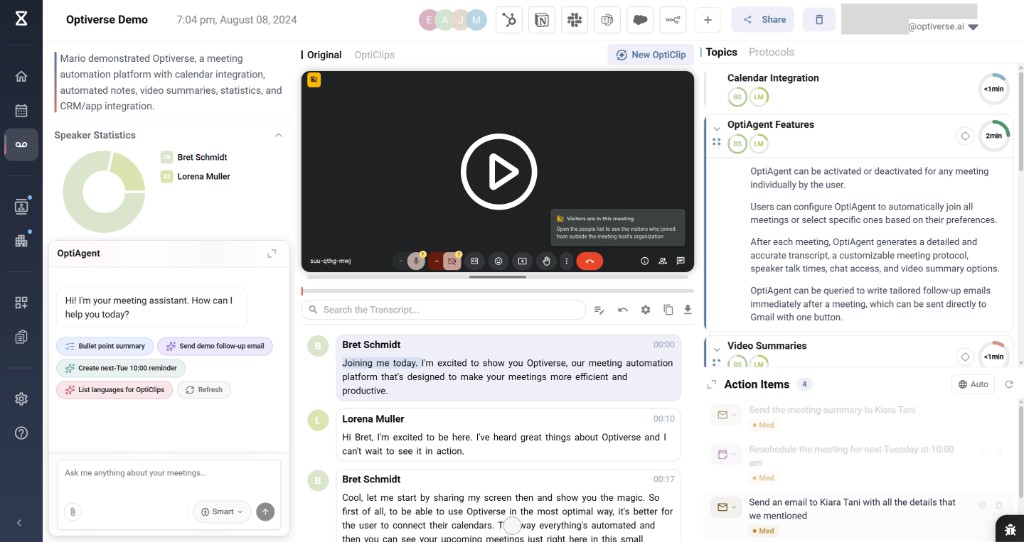
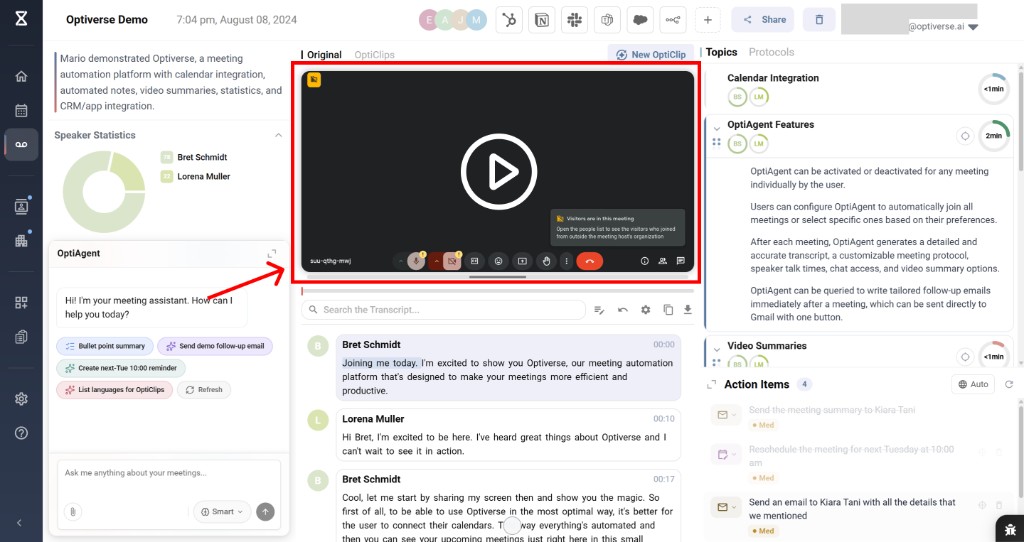
The center of the recording page features the meeting playback. What you see here depends on how the meeting was captured:
| Capture method | What you see |
|---|---|
| Note-taker with video enabled | Full video player with speaker faces and screen shares |
| Note-taker with video disabled | Audio waveform player (no visual video) |
| Desktop app (live transcription) | Transcript only (no audio or video preserved) |
| Mobile app recording | Audio waveform player only |
| Desktop upload (audio file) | Audio waveform player only |
| Desktop upload (video file) | Full video player |
You can:
- Play, pause, and scrub through the recording
- Click on any sentence in the transcript to jump to that exact moment in the video
- Adjust playback speed
- Use the video controls to take screenshots, toggle captions, or enter full screen
Transcript
Below the video, the full conversation transcript appears with each speaker turn timestamped and color-coded. A search bar at the top lets you find specific words or phrases instantly.
When to edit the transcript
In most cases, you don't need to edit the transcript at all. The AI assistants understand context and can answer questions, generate summaries, and extract action items regardless of whether speaker labels are perfectly accurate.
However, editing becomes valuable when you need to generate:
- Official protocol documentation with correct assignment of who said what
- Decision logs where it matters exactly who committed to a specific action
- Compliance records that require precise speaker attribution
- Custom summaries using protocols that assign tasks based on speaker identity
In these cases, correctly labeled speakers guarantee that the AI model doesn't misinterpret anything, because it's clearly fed the information of who said what.
Editing transcript text
You can edit the actual transcribed text directly. This is useful when the AI misheard a word, a proper noun, or industry jargon.
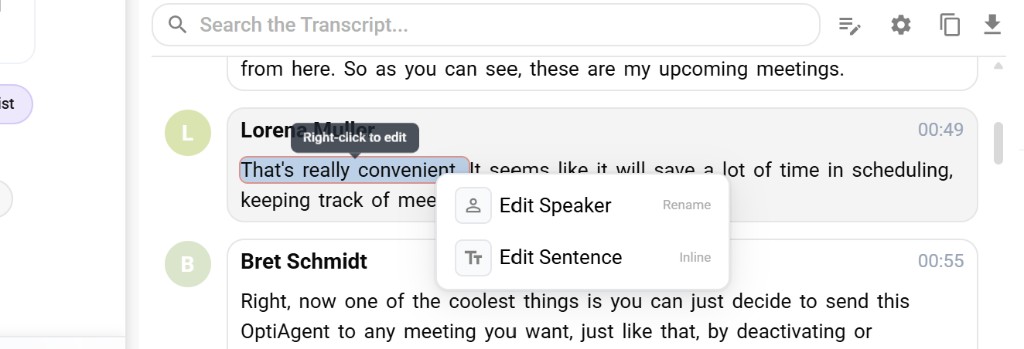
Method 1: Right-click to edit
Hover over any sentence in the transcript and right-click. A context menu appears with two options:
- Edit Speaker (Rename): Change who said this segment
- Edit Sentence (Inline): Correct the text itself
Method 2: Editing mode
For bulk edits, click the editing mode icon in the transcript toolbar. This activates a full editing view where you can click on any sentence to edit it directly, without needing to right-click each time.
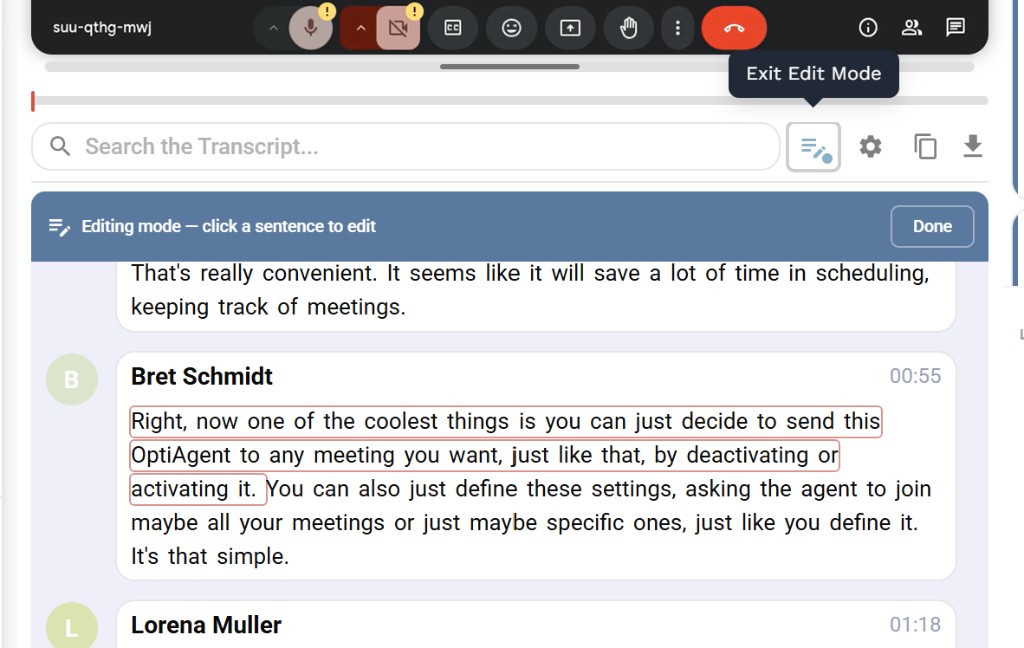
A banner at the top confirms you're in editing mode ("Editing mode, click a sentence to edit"). Click Done or the edit icon again to exit.
Labeling speakers
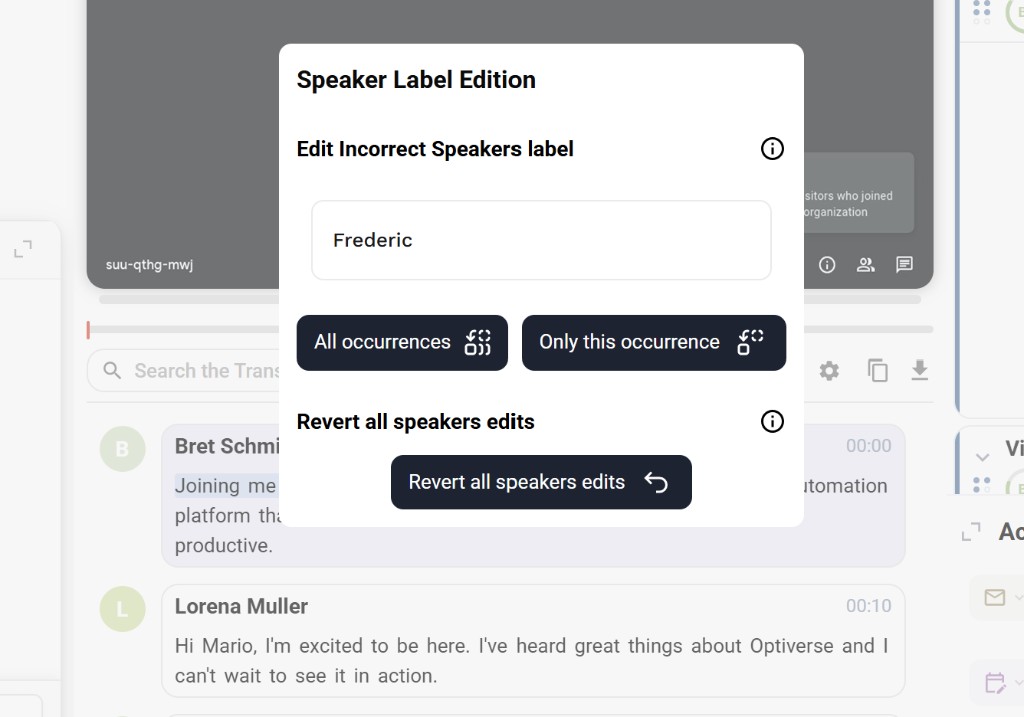
The AI automatically detects different speakers, but may not always know their names. To rename a speaker, click on their name in the transcript. A Speaker Label Edition dialog opens where you can:
- Type the correct name
- Apply the change to All occurrences (renames this speaker everywhere in the transcript)
- Apply to Only this occurrence (useful if the AI merged two people into one speaker)
- Revert all speakers edits if you want to start over
Once speakers are correctly labeled, all downstream features (summaries, action items, OptiAgent answers) will use the correct names.
Add frequently used terms to your organization's Custom Dictionary to reduce recurring transcription errors across all future meetings. This prevents you from needing to manually fix the same words repeatedly.
Speaker Statistics
On the left panel, below the meeting description, you'll find Speaker Statistics showing:

- A donut chart with speaking time per participant
- Each speaker's name and their corresponding color
This is valuable for coaching, sales call reviews, and understanding meeting dynamics (e.g., was one person dominating the conversation?).
OptiAgent
Every recording page has an OptiAgent chat interface in the left panel. This is your personal AI assistant that lives directly on the meeting page. It can answer questions about the recording, but it's far more powerful than a simple Q&A bot.
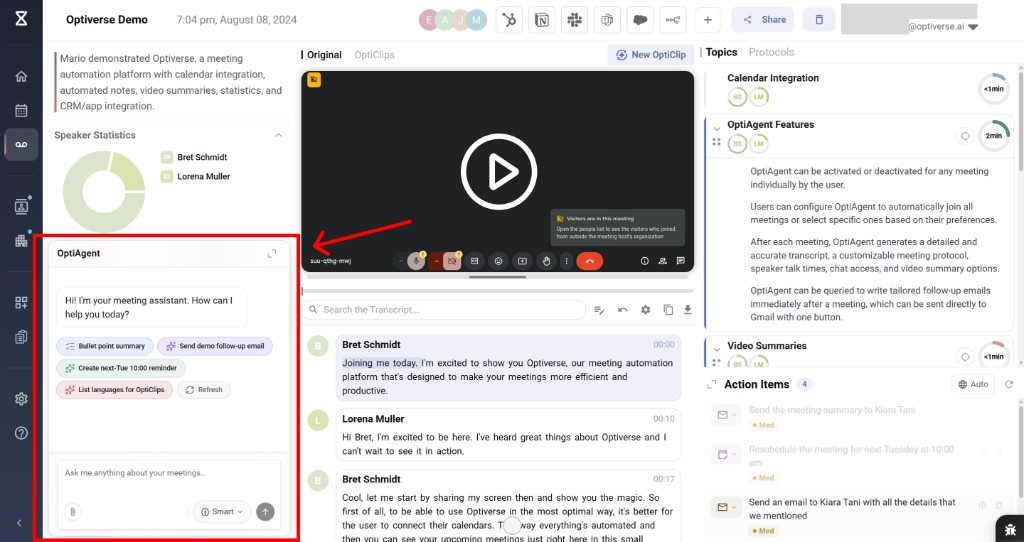
OptiAgent suggests quick actions based on the meeting content (such as "Bullet point summary," "Send demo follow-up email," or "Create next-Tue 10:00 reminder"), and you can also ask anything in natural language using the chat input.
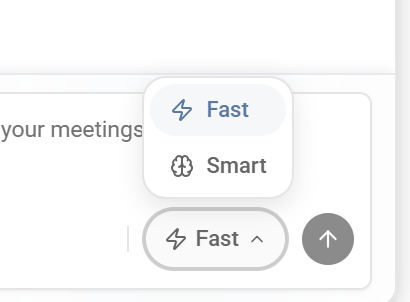
Fast and Smart modes
OptiAgent offers two thinking modes, which you can toggle at the bottom of the chat:
| Mode | Best for |
|---|---|
| Fast | Working with the single meeting in front of you. Quick answers, summaries, email drafts based on this recording's content. |
| Smart | Complex tasks involving multiple meetings, attachments, deep research, or combining knowledge across recordings. |
Use Fast mode for everyday questions and single-meeting tasks. Switch to Smart mode when you need cross-meeting analysis, detailed research, or multi-step workflows.
Agent tools
OptiAgent has access to a comprehensive set of tools, organized by category:
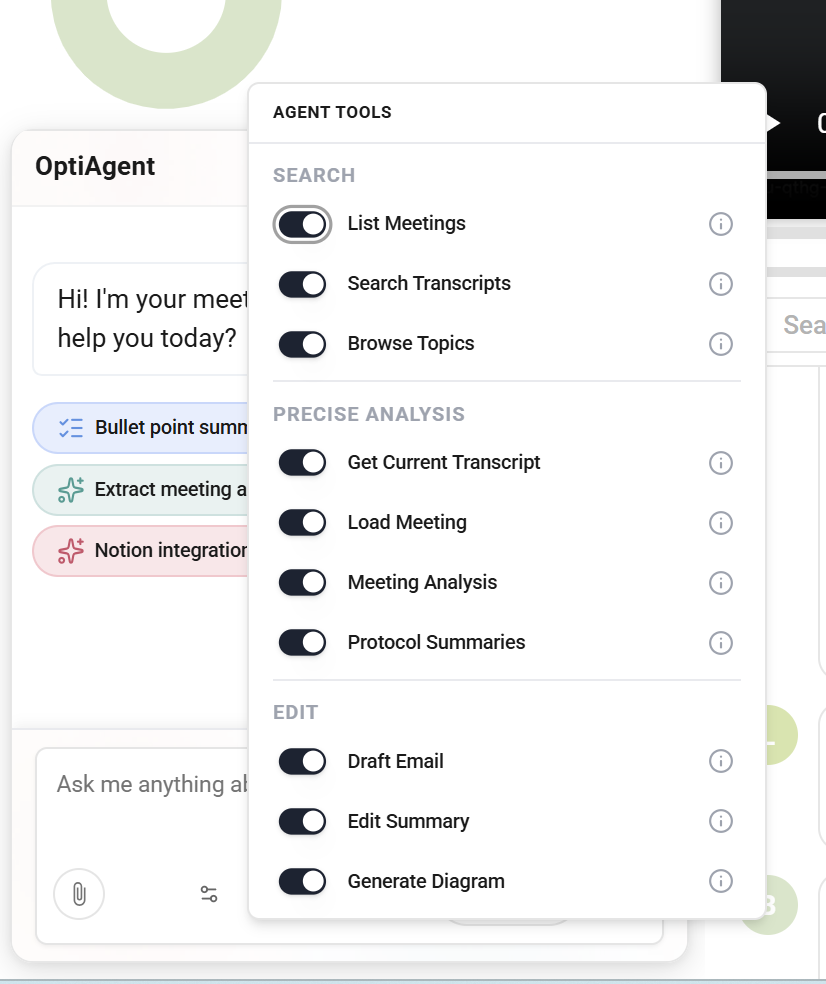
Search tools:
- List Meetings: Browse all your meetings to find specific topics
- Search Transcripts: Search across transcripts of other recordings
- Browse Topics: Explore topics discussed across your meeting library
Precise Analysis tools:
- Get Current Transcript: Load the full transcript of the current meeting for detailed analysis
- Load Meeting: Load another meeting's data to combine with the current one
- Meeting Analysis: Perform deep analysis on meeting content
- Protocol Summaries: Generate or reference protocol-based summaries
Edit tools:
- Draft Email: Generate tailored follow-up emails ready to send directly to Gmail
- Edit Summary: Modify the meeting summary on the page directly
- Generate Diagram: Create visual diagrams based on meeting content
What you can do with OptiAgent
Because of these tools, OptiAgent goes well beyond answering questions about the current recording:
- Answer questions: "What did the client say about the timeline?"
- Generate follow-up emails: "Draft a follow-up email summarizing the next steps" (sends directly to Gmail with one button)
- Search across meetings: "Find all meetings where we discussed the Q3 budget"
- Combine knowledge: Load data from multiple meetings and synthesize it into a single summary or action plan
- Create visuals: Generate diagrams to illustrate meeting content or decisions
- Edit the summary directly: Ask OptiAgent to rewrite or restructure the meeting summary on the page
- Deep research: Ask complex questions that require analyzing multiple recordings together
For a full overview of OptiAgent capabilities, see What is OptiAgent.
Topics and Summary
The right panel of the recording page contains two tabs: Topics and Protocols.
Topics
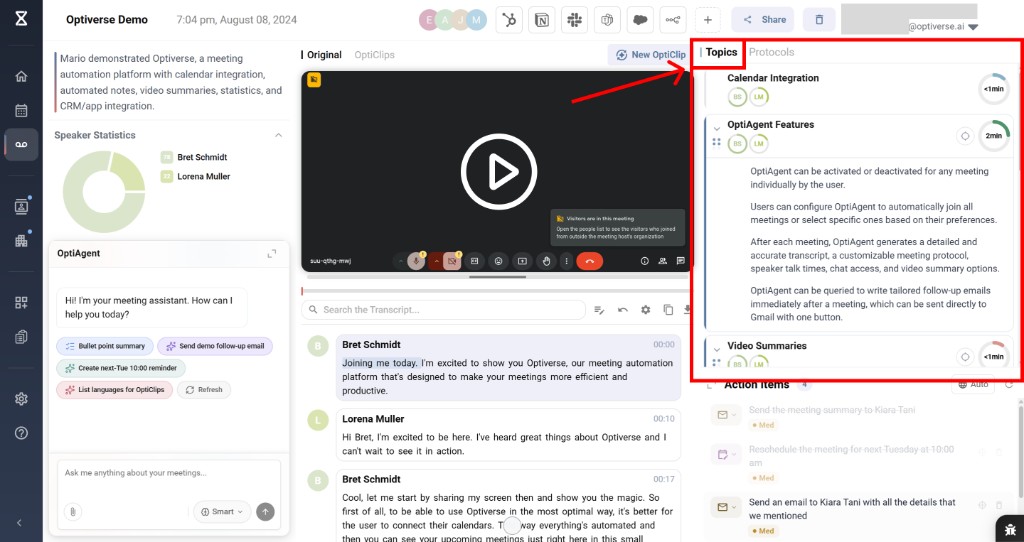
Every meeting, regardless of which summary template is selected, is always analyzed in a topic analysis view. This provides:
- Extracted topics: The main subjects discussed during the meeting
- Action points per topic: Key takeaways derived from each topic
- Contributing speakers: Which participants spoke on each topic, shown with their avatar
- Time spent: Approximate duration spent on each topic
Everything in the topic analysis is linked back to the video and transcript. Click on any topic to jump to the relevant section, making it easy to trace where the data comes from.
Topic analysis is always generated automatically for every meeting. It works independently of your protocol/template selection and gives you a structured overview regardless of your summary format.
Protocols (Meeting Summary)
Toggle from Topics to Protocols to see the AI-generated meeting summary based on your selected template.
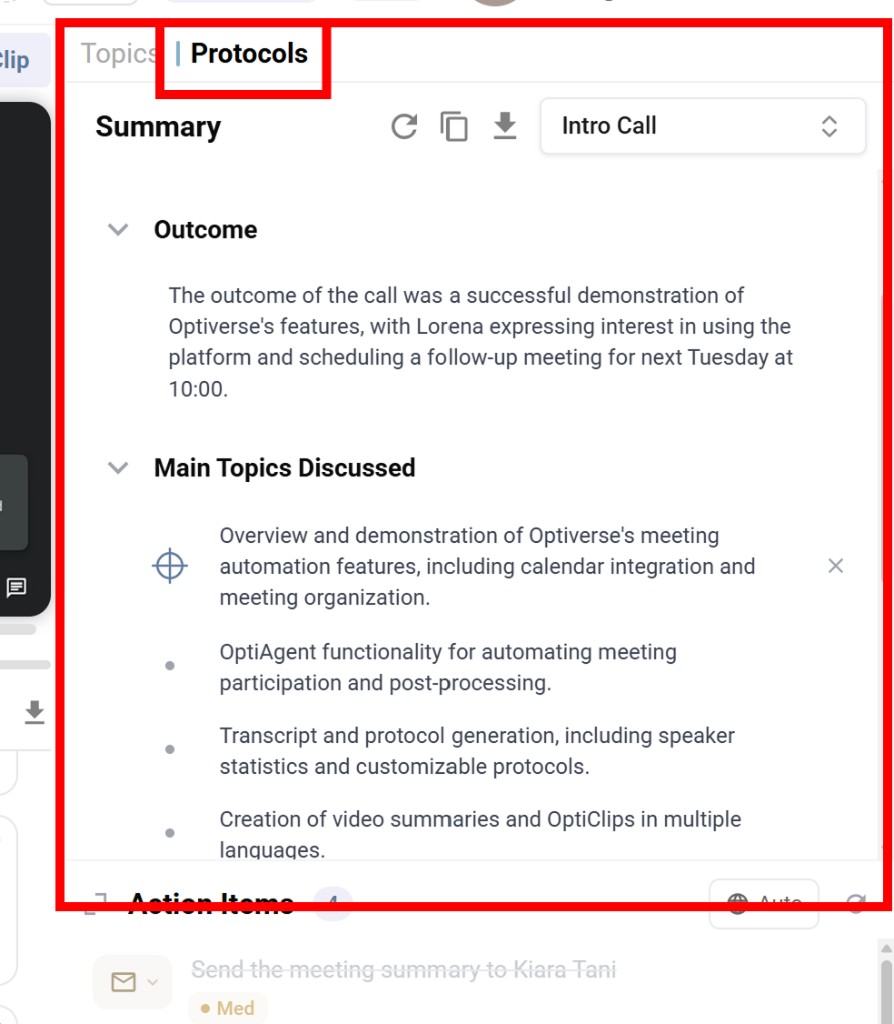
The summary structure depends entirely on which protocol is applied. In this example, an "Intro Call" protocol produces an Outcome section and a Main Topics Discussed section. Other protocols will produce completely different structures (e.g., a sales call protocol might extract BANT criteria, while a board meeting protocol might produce formal minutes).
At the top of the summary, you'll find action buttons to regenerate, copy, or download the summary.
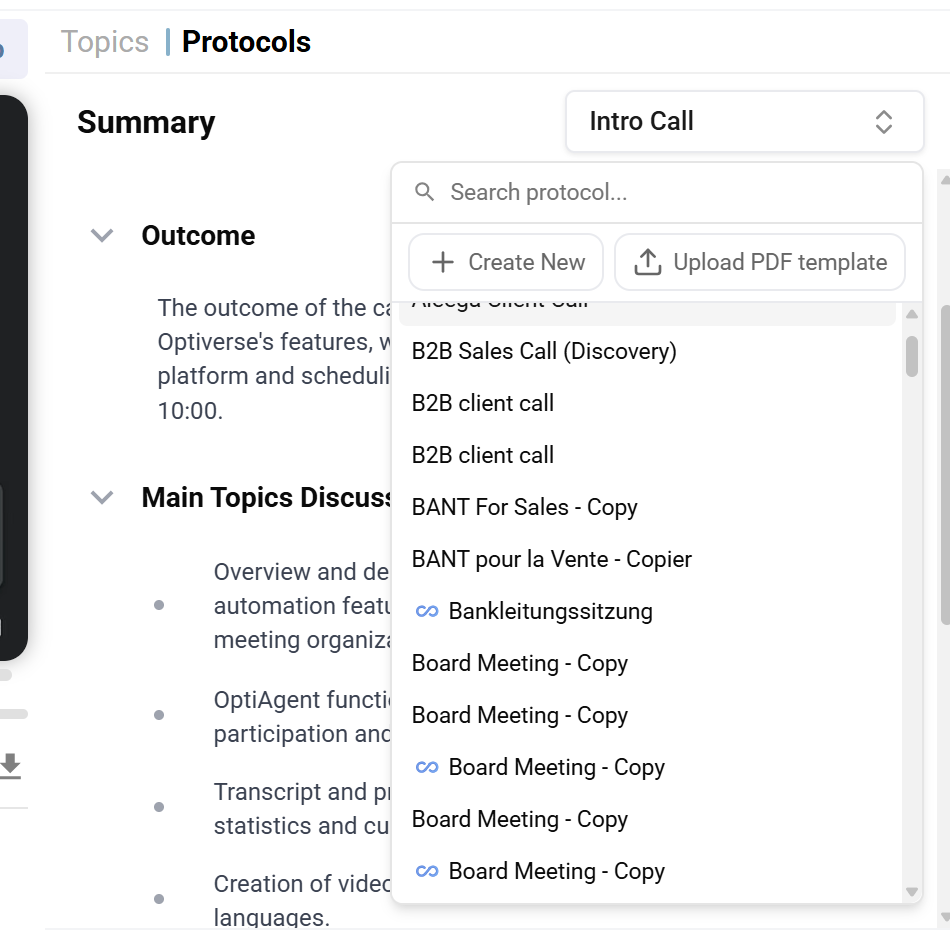
Switching protocols
Click the protocol name in the top right corner (e.g., "Intro Call") to open the protocol selector. From here you can:
- Search across all your available protocols
- Create New protocols directly from the recording page
- Upload PDF template to generate a protocol from an existing document
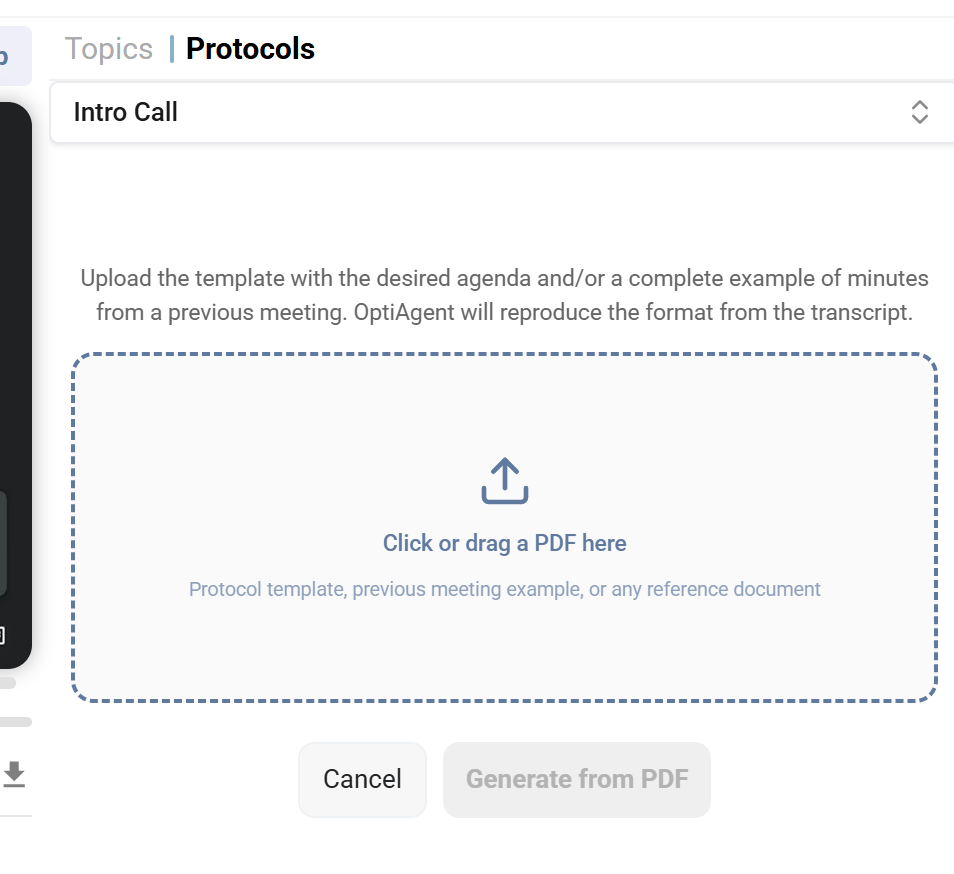
Uploading a PDF to create a protocol
If you don't have a protocol template in Optiverse yet, you can upload a PDF directly from the recording page. This can be a template with your desired agenda, a complete example of minutes from a previous meeting, or any reference document. OptiAgent will reproduce the format from the transcript and generate a protocol template based on that document, all at once.
Editing the summary
The summary is a live text editor. You can directly modify any part of it on the page: fix wording, add missing details, restructure sections, or remove irrelevant content. Changes are saved automatically.
If you'd rather not edit manually, you can ask OptiAgent to modify the summary for you. Because OptiAgent has the "Edit Summary" tool, it can rewrite, expand, or restructure the summary based on your instructions (e.g., "Add the budget numbers to the outcome section" or "Rewrite this in a more formal tone").
For a deep dive into creating and managing protocols, see Protocols & Summaries.
Action Items
Below the summary on the right panel, Optiverse automatically extracts Action Items from the conversation. Each action item includes:
- Task description: A clear statement of what needs to be done
- Assigned person: The responsible party, based on speaker attribution during the meeting
- Priority level: Marked as High, Medium, or Low based on the urgency conveyed in the conversation
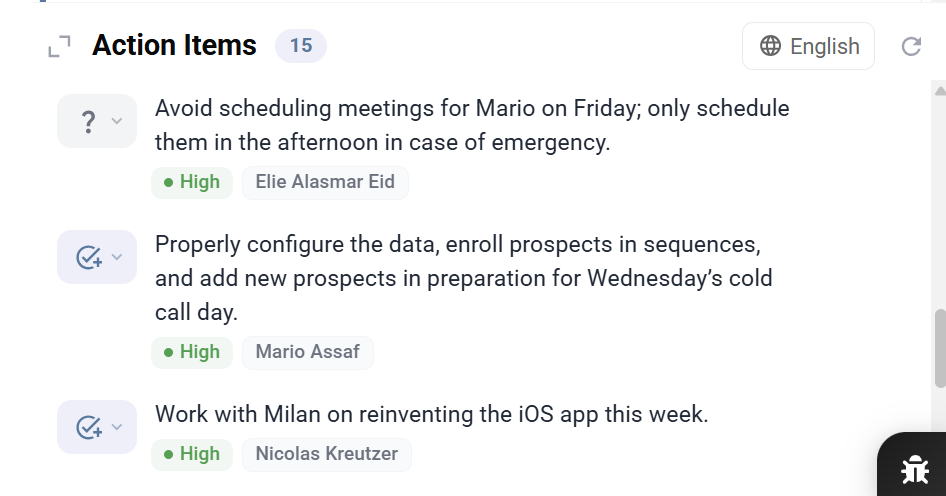
The status icon on the left of each action item indicates its current state. You can click the dropdown to change the status (e.g., mark an item as completed or in progress).
Action items are fully editable: you can modify the description, reassign the responsible person, change the priority, or remove items entirely. You can also manually add new action items that weren't automatically detected.
Once finalized, action items can be pushed to connected tools like task boards, your CRM, or automation workflows.
The quality of action item extraction improves when speakers are correctly labeled. If a participant commits to something during the meeting, the AI will attribute the task to them by name.
Sharing and Export
From the recording page, you can share the meeting with others and export the content.
Sharing a recording
Click the Share button in the top-right corner of the recording page to open the sharing dialog. From here you can:
- Share with specific people: Enter email addresses in the input field and click Share. Recipients will receive access to the full recording, transcript, and summary.
- View current access: The "Shared With" section shows all users who currently have access, along with their permission level (e.g., Owner).
- Remove access: Click the × next to any user to revoke their access.
- Enable public sharing: Toggle the public link switch to allow anyone with the link to view the meeting. Click Copy Link to copy the shareable URL to your clipboard.
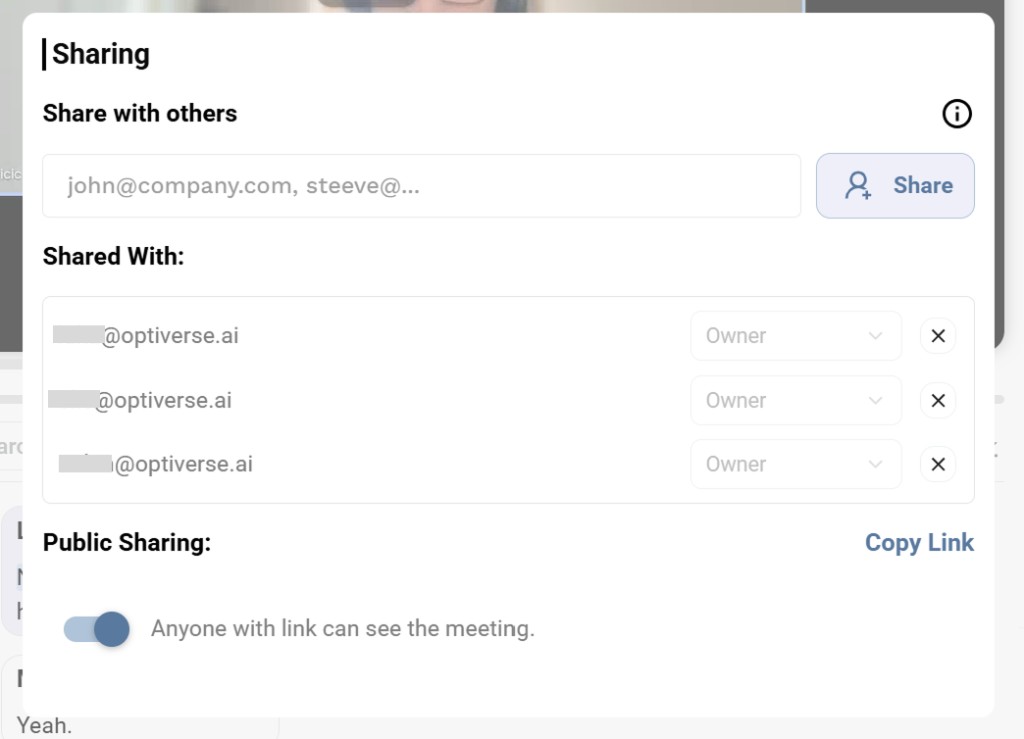
When public sharing is enabled, anyone with the link can see the meeting. Use this carefully for sensitive or internal meetings. You can disable it at any time by toggling the switch off.
Export options
You can also:
- Export the summary as PDF or Word
- Push to connected integrations (CRM, task tools, n8n workflows)
For full details on who can access recordings and how sharing works, see Access & Sharing.
Additional Actions
| Action | How |
|---|---|
| Rename the recording | Click the title at the top of the page |
| Reprocess with a different protocol | Select a new protocol from the Protocols tab |
| Delete the recording | Trash icon on the recording page or three-dots menu in the list. See Deleting Recordings for details on ownership and deletion options. |
| Push to integration | Send the summary to a connected tool (see Integrations) |
| Download transcript | Click the download icon in the transcript toolbar |
| Copy transcript | Click the copy icon in the transcript toolbar |